
Contents
Water damage and mold go together more reliably than most homeowners realize. Whether the source was a burst pipe, a storm flood, an appliance leak, or roof damage from heavy rain, any water event that saturates building materials creates conditions where mold can begin growing within 24 to 48 hours. Knowing how to test for mold after water damage is one of the most important steps in protecting your home and your family, because mold that establishes in saturated materials often grows in areas that are not visible during a standard inspection.
The most important thing to understand upfront is that the absence of visible mold does not mean mold is absent. Water that penetrates drywall, insulation, subfloor material, or wall cavities creates hidden growing conditions that may not produce visible surface growth for days or weeks. By the time the patch appears on a wall or ceiling, an established colony is already well underway beneath the surface. Testing for mold after a water event rather than waiting for visible signs is what allows you to address the problem before it reaches that stage. We will walk through every method available, from simple DIY indicators to professional testing, so you can determine the right approach for your situation.
Why Water Damage Creates Immediate Mold Risk
Understanding why water damage is such a reliable precursor to mold growth helps you take the right steps in the right order after any water event.
How Moisture Drives Mold Colonization
Mold spores are present in virtually every indoor environment in small quantities that cause no harm. The problem begins when a moisture event creates the conditions those dormant spores need to germinate and colonize. Porous building materials including drywall, wood framing, insulation, and subfloor panels absorb and retain moisture long after the surface appears dry. These materials also contain the organic compounds that mold uses as a food source. When moisture and organic material combine in a warm enclosed space, mold colonization is not a possibility. It is a near certainty if the moisture is not extracted and dried professionally within the first 24 to 48 hours.
Why Florida Homes Are Especially Vulnerable
In Florida’s climate, the outdoor humidity that persists after any storm or flooding event slows the natural drying of water-damaged materials significantly. Even with windows open and fans running, saturated drywall and subfloor material in a Florida home may retain elevated moisture levels for a week or more without professional drying equipment. This extended window gives mold far more time to establish before materials approach safe moisture levels. If your home has experienced any water damage, beginning professional water damage restoration immediately is the most effective way to close that window before mold develops.
Signs That Mold May Have Already Developed After Water Damage
Before beginning any formal testing, these indicators suggest that mold has already established in a water-damaged area of your home.
Indicator | What It Suggests |
Musty or earthy odor in the affected area | Active mold colony producing microbial volatile organic compounds |
Discoloration or staining on walls or ceilings beyond the original water stain | Mold growth extending from the moisture-affected zone |
Paint bubbling or peeling near the water-damaged area | Moisture trapped behind the wall surface pushing outward |
Soft or spongy drywall surface | Material saturation sufficient for deep mold colonization |
Respiratory symptoms in household members that worsen at home | Elevated airborne spore levels from active mold growth |
Visible fuzzy or powdery patches on any surface | Established surface mold colony |
If any of these are present, formal testing becomes urgent rather than precautionary.
Methods for Mold Testing in Home After Water Damage
There are several approaches to mold testing in home situations following a water event. The right method depends on the extent of the damage, whether visible mold is present, and how certain you need to be about the results.
Visual Inspection With a Systematic Approach
The first step in any post-water-damage mold assessment is a thorough visual inspection of all affected areas. This goes beyond looking at the obvious water stain. A systematic visual inspection covers:
Inspect above the visible water line. Moisture wicks upward through drywall and wood by capillary action. The actual extent of material saturation is consistently higher than the visible flood or leak line. Inspect walls at least 12 to 18 inches above any visible water mark.
Check all adjacent materials. Water travels horizontally through flooring and between wall cavities. Inspect flooring, baseboards, lower wall surfaces, and the interior of any cabinets adjacent to the water source.
Look behind and beneath items. Furniture, appliances, and stored items that sat in or near water can harbor mold on their undersides and backs where airflow is minimal and drying is slowest.
Use a flashlight in corners and enclosed spaces. Mold establishes first in dark corners, in enclosed cabinet spaces, behind large appliances, and along the base of walls where moisture accumulates.
Visual inspection alone cannot rule out hidden mold. It can only confirm what is already visible. For a thorough assessment, additional testing methods are required.
DIY Mold Test Kits
Consumer mold test kits are available at hardware stores and provide a basic starting point for mold testing in home situations. They typically come in two forms.
Swab or surface test kits involve taking a sample from a visible mold patch or a suspicious surface using a swab and sending it to a laboratory for identification. These kits confirm whether a specific surface growth is mold and can identify the species. They are only useful where visible growth is already present and cannot detect hidden or airborne mold.
Air sampling test kits use a petri dish placed in the room for a set period to collect airborne spores that settle onto the growth medium. After the collection period the dish is sealed and sent to a laboratory. Results indicate the types and quantities of mold spores present in the air of that room.
Limitations of DIY Kits
DIY test kits provide useful basic information but have meaningful limitations in a post-water-damage situation. Air sampling petri dishes collect whatever settles during the open period, which is influenced by airflow conditions, and do not provide the quantitative air sampling data that professional equipment produces. They also cannot identify where the mold source is located, assess moisture levels in building materials, or detect growth inside walls. For water damage events affecting more than a small isolated area, DIY kits should be considered a preliminary indicator rather than a definitive assessment.
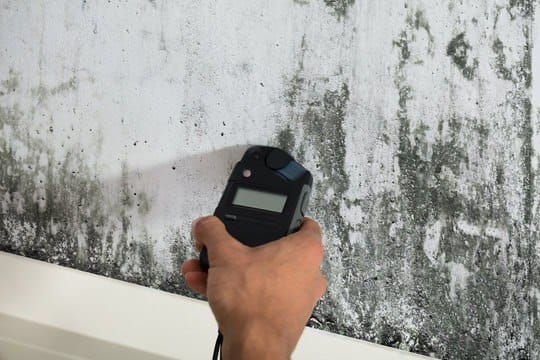
Moisture Meter Testing
A moisture meter is one of the most useful tools for identifying where mold is likely to develop or has already established after a water event, even before visible growth appears. Moisture meters measure the moisture content of building materials by probing the surface or using an electromagnetic field.
Wood subfloor and framing materials at or above 19 percent moisture content are at high risk for mold growth. Drywall above 1 percent moisture content by weight indicates ongoing saturation. Any reading elevated significantly above baseline in a material adjacent to a water event indicates a zone where mold testing should be prioritized.
Moisture meters are available at hardware stores and give homeowners a meaningful tool for mapping which materials remain saturated after initial drying efforts. These readings also help you communicate clearly with a professional mold inspector about which areas concern you most.
Professional Air Sampling
Professional air sampling uses calibrated equipment to measure the actual concentration of mold spores in the indoor air and compare that to outdoor baseline levels. This is the most reliable method for detecting elevated mold levels in a home after water damage because it captures what is present in the air regardless of whether visible growth has appeared.
A professional takes samples from affected rooms and compares them to an outdoor control sample. Indoor spore counts significantly higher than outdoor baseline, or indoor counts showing species not present outdoors, indicate active mold growth somewhere in the building even when no visible source can be found. This testing method is particularly valuable in the weeks following a water event when mold may have established inside wall cavities or beneath flooring without yet producing visible surface growth.
Professional Surface and Bulk Sampling
Where visible mold or suspicious material is present, a professional home mold inspection includes surface swab sampling and in some cases bulk sampling, where a small piece of the suspect material is collected and sent to a laboratory. These methods identify the specific mold species present and help determine the appropriate remediation approach.
Surface sampling combined with air sampling provides the most complete picture of what is present, where it is coming from, and how serious the contamination is. Our existing guide on how to test for toxic black mold provides a detailed breakdown of the specific testing approaches used for identifying dangerous mold species.
Thermal Imaging Inspection
Professional mold inspectors use thermal imaging cameras to identify temperature differentials in walls, floors, and ceilings that indicate moisture trapped inside building cavities. Wet materials hold temperature differently from dry materials, creating a visible temperature pattern on the thermal image that identifies exactly where moisture is present without requiring any destructive opening of walls.
Thermal imaging is particularly valuable after water damage because it allows a comprehensive moisture map of the entire affected area in minutes, identifying hidden moisture in locations that would require cutting into walls to find otherwise. Areas identified by thermal imaging as moisture-affected are then prioritized for air sampling, moisture meter testing, and potential material removal.
Understanding Your Test Results
Once testing is complete, understanding what the results mean helps you determine the appropriate next step.
Result | What It Means | Recommended Action |
No elevated moisture, no visible mold, normal air sampling | Water damage dried adequately, no mold established | Continue monitoring for 30 days with periodic inspection |
Elevated moisture without visible mold | Mold risk zone, active drying required | Continue drying and retest moisture levels in 48 to 72 hours |
Visible surface mold on hard nonporous surface | Surface growth, likely limited penetration | DIY treatment may be appropriate if area is under 10 sq ft |
Visible mold on drywall, wood, or insulation | Penetration into porous material | Professional mold removal required |
Elevated air sampling with no visible source | Hidden mold in wall cavities or beneath flooring | Professional inspection and thermal imaging required |
Black mold confirmed by surface sampling | Stachybotrys chartarum present | Immediate professional black mold removal required |
When to Call Trusted Mold Removal Experts
Some post-water-damage situations are appropriate for careful monitoring and basic DIY testing. Many are not. Calling trusted mold removal experts is the right decision when:
The water event was significant enough to saturate drywall, flooring, or wall cavities. At this level of saturation, consumer testing provides incomplete information and professional moisture mapping and air sampling is necessary for a reliable assessment.
Testing results indicate elevated spore counts or confirmed mold on porous materials. Treatment of mold that has penetrated building materials requires professional equipment, containment, and HEPA vacuuming that DIY methods cannot replicate.
Visible mold appeared within days of a water event. This indicates the rate of colonization was rapid, which suggests more extensive hidden growth may be present than the visible patch represents.
Household members are experiencing respiratory symptoms or allergic reactions following the water event. These are signs of elevated indoor spore levels that require both source identification and professional elimination.
The water event involved sewage backflow, storm surge, or any contaminated water source. These events introduce biological contaminants alongside mold risk and require professional assessment and remediation regardless of mold test results.
The team at The Mold Guys provides comprehensive post-water-damage mold inspection and testing services across Southwest and Central Florida. With over 25 years of experience identifying and resolving mold problems after Florida’s frequent storm and water damage events, they have the equipment and expertise to assess your home thoroughly and provide a clear remediation plan when one is needed.
What Happens After Mold Is Confirmed
When mold testing confirms active growth following water damage, remediation should begin as quickly as possible. Delaying treatment after confirmation allows continued colonization and increasing spore levels in your indoor air.
Professional remediation after water damage mold confirmation involves containment of the affected area, HEPA vacuuming of all surfaces, removal of contaminated materials, commercial antimicrobial treatment, thorough structural drying, and post-remediation air sampling that confirms spore levels have normalized before the space is cleared.
For a complete overview of the remediation process and what to expect at each stage, our guide on the complete guide to mold remediation covers every step in detail.
After remediation, preventing recurrence starts with the same practices that would have limited mold risk after the original water event: complete drying within 24 to 48 hours, humidity control below 50 percent, and addressing any ongoing moisture sources before closing up repaired areas. Our guide on what to do after mold remediation to keep your home mold-free provides a practical long-term maintenance framework.
Final Thoughts
Knowing how to test for mold after water damage removes the uncertainty that leaves many homeowners either ignoring a serious problem or overreacting to a manageable one. The testing methods range from basic visual inspection and consumer test kits appropriate for minor isolated events, to professional air sampling and thermal imaging that provide the comprehensive assessment that significant water damage situations require.
The common thread in all post-water-damage mold testing is this: act quickly, test systematically, and do not rely on the absence of visible growth as evidence that no problem exists. When in doubt, a professional home mold inspection is always the most reliable next step.
Contact The Mold Guys today for professional mold testing and inspection following any water damage event. Their team serves homeowners across Southwest and Central Florida with the thorough assessment and trusted mold removal expertise that post-water-damage situations demand.
FAQs
Q: How soon after water damage should I test for mold?
A: Testing should begin within 24 to 72 hours of a water event. Mold can germinate within 24 to 48 hours on saturated materials. Early testing allows intervention before colonies establish deeply in porous building materials and before spore counts in indoor air become elevated.
Q: Can I use a home mold test kit after water damage?
A: DIY kits provide a basic starting point but have significant limitations after water damage. They cannot detect hidden moisture in walls, map contamination scope, or provide the quantitative air sampling data professional testing delivers. For any significant water event, professional home mold inspection is the more reliable choice.
Q: What does a musty smell after water damage mean?
A: A musty smell after water damage is a strong indicator that mold has already begun growing somewhere in the affected area, even if no visible growth is present yet. The odor comes from microbial volatile organic compounds produced by active mold colonies. Professional testing should follow immediately.
Q: Does all water damage lead to mold?
A: Not necessarily. Water damage dried completely within 24 to 48 hours using professional extraction and drying equipment does not always produce mold growth. The risk increases significantly when drying is delayed, incomplete, or when materials remain saturated for more than 48 hours in a warm environment.
Q: What mold species most commonly appears after water damage?
A: Cladosporium, Penicillium, and Aspergillus are the most common species found after water damage. Stachybotrys chartarum, or black mold, develops in situations involving prolonged saturation of cellulose-rich materials. Professional surface sampling is the only reliable way to identify which species is present in your home.