
Your air conditioning system is designed to improve your home’s comfort and air quality. When mold establishes inside the ductwork, it does exactly the opposite. Air duct mold turns your HVAC system into a distribution network for mold spores, carrying contaminated air from a single affected section into every room connected to the same duct network. Understanding how to kill mold in AC ducts correctly is critical both for eliminating the health risk and for doing so without damaging the components that your system depends on to function.
The most important starting point is this: the method used to treat duct mold depends entirely on what type of ductwork you have and where in the system the mold is located. Using the wrong cleaning agent or approach on the wrong duct material can degrade the duct lining, reduce system efficiency, and in some cases push mold spores deeper into the system rather than eliminating them. We will walk through the complete process from identification to treatment and prevention, and make clear at each stage when the situation calls for professional help rather than a DIY approach.
Why Mold Grows in AC Ducts
Before treating air duct mold, understanding why it develops in the first place is essential for both effective treatment and lasting prevention.
Condensation Inside Ductwork
The most common cause of duct mold is condensation forming on the interior surfaces of the ductwork. When cool conditioned air flows through ducts that pass through hot unconditioned spaces like attics, crawl spaces, or wall cavities, the temperature differential causes moisture to condense on the duct wall interior. This moisture accumulates over time and creates ideal growing conditions for any mold spores carried by the airflow.
Duct Leaks Allowing Humid Air Entry
Gaps, loose connections, or deteriorating seals in ductwork allow warm humid outdoor air to enter the duct system where it meets the cooler interior air and condenses. Florida’s outdoor humidity levels make this a particularly significant duct mold driver because the air entering through any gap is heavily moisture-laden year-round.
Oversized or Short-Cycling AC Units
An air conditioning unit that is too large for the space it serves cools the air quickly but does not run long enough to remove adequate moisture from the indoor air. This short-cycling behavior results in higher indoor humidity levels than a properly sized unit would maintain. Elevated indoor humidity means more moisture available to condense inside ductwork during each cooling cycle.
Dirty or Restricted Air Filters
When HVAC air filters are overdue for replacement, dust and debris accumulate on the filter and restrict airflow. This reduced airflow increases the time conditioned air spends in the ductwork, allowing more condensation to form. It also allows smaller particles including mold spores and organic debris to bypass the filter and accumulate inside the ducts where they provide a food source for mold growth.
Moisture from Previous Mold and Water Damage Repair
Homes that have experienced water damage and subsequent mold and water damage repair sometimes have residual elevated moisture in the building structure that affects the surrounding HVAC system. Water that entered wall cavities, ceilings, or attic spaces during a flood or leak can migrate to adjacent ductwork and introduce persistent moisture that supports ongoing mold growth even after surface repairs are complete.
Identifying Air Duct Mold in Your Home
Before beginning any treatment, confirm that mold is actually present in your ductwork rather than on other surfaces or components of the system.
Signs of Mold in the Duct System
Musty odor that appears when the system runs. This is the most reliable indicator. A musty smell that begins or intensifies the moment the AC kicks on points directly to the duct system or air handler as the source, since the odor is being carried from within the system into the living spaces.
Visible growth around vent registers. Dark spots or fuzzy growth on or immediately around ceiling or floor vent covers indicates mold growing just inside the duct opening or on the register surface itself.
Increased allergy or respiratory symptoms throughout the home. Unlike mold in a single room, duct mold affects every room serviced by the system. If household members experience symptoms in multiple rooms simultaneously rather than in one specific area, duct contamination is a plausible source.
Visible mold on the air handler, evaporator coil, or drip pan. These components are checked by removing the access panel on the air handler unit. The evaporator coil and drip pan area are high-moisture zones and among the first places mold appears in an HVAC system.
Dust that reappears quickly after cleaning. Duct mold grows alongside dust and debris accumulation. If your home accumulates dust unusually quickly after thorough cleaning, the HVAC system may be recirculating contaminated air.
Understanding Your Duct Type Before Treatment
This step is non-negotiable before applying any cleaning agent or treatment to your ductwork. Different duct materials require different approaches and are damaged by different products.
| Duct Type | Material Characteristics | What to Avoid |
| Sheet metal ducts | Hard nonporous surface, durable | Strong acids, abrasive tools that scratch the surface |
| Flex ducts (flexible plastic) | Lightweight, inner lining can be damaged | Stiff brushes, harsh chemicals, pressure spraying |
| Fiberglass duct board | Porous insulated material, cannot be effectively cleaned | Any liquid cleaning agents, bleach, aggressive brushing |
| Internally lined metal ducts | Metal exterior with fiberglass lining inside | Liquid sprays, bleach, any product that saturates the lining |
Fiberglass duct board and internally lined metal ducts that show significant mold growth cannot be cleaned and must be replaced. Applying cleaning solutions to these materials saturates the porous lining and creates ongoing moisture retention that accelerates further mold growth rather than eliminating it. If your system uses these duct types and mold is confirmed inside, professional assessment and replacement of affected sections is the correct approach.
How to Kill Mold in AC Ducts: Safe Treatment Methods
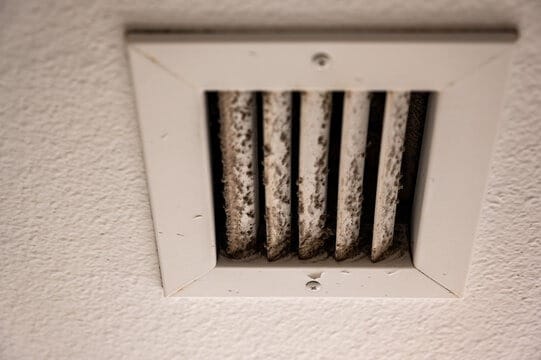
For sheet metal ductwork where mold is accessible near the vent openings and the system’s air handler components, the following treatment approach is appropriate for homeowners.
Step 1: Turn the System Off Completely
Turn off your HVAC system at the thermostat and at the breaker before beginning any inspection or cleaning. Running the system while cleaning distributes spores throughout the home. Keep it off until all cleaning steps are complete and treated surfaces are fully dry.
Step 2: Put On Protective Gear
Wear an N95 respirator, rubber gloves, and safety goggles before touching any duct components. Mold in ductwork is disturbed easily and releases spores in concentrated bursts when physically handled. Protective gear is mandatory even for inspection tasks.
Step 3: Clean and Treat the Vent Registers
Remove all vent register covers. Soak them in a mixture of warm water and white vinegar for 20 to 30 minutes. Scrub all surfaces thoroughly with a stiff brush. For registers showing significant dark staining, follow the vinegar soak with a spray of hydrogen peroxide, allow 10 minutes of contact time, and scrub again. Rinse and allow to dry fully before reinstalling.
Step 4: Clean the Accessible Interior Near Each Vent Opening
For metal ductwork, use a long-handled soft brush or a microfiber cloth attached to an extension rod, dampened with undiluted white vinegar, to clean the interior duct surfaces within reach of each vent opening. Work carefully and methodically, wiping surfaces rather than scrubbing aggressively to avoid releasing large spore clouds. Wipe with a clean damp cloth after the vinegar treatment and allow the surface to dry completely.
Do not attempt to clean more than a few inches inside the duct opening without professional equipment. Reaching further into the ductwork without a HEPA vacuum running simultaneously to capture displaced spores simply pushes contamination deeper into the system.
Step 5: Clean the Air Handler, Drip Pan, and Evaporator Coil Area
Open the air handler access panel. Inspect the drip pan for standing water, slime, or visible mold. Remove standing water with a wet vacuum. Scrub the drip pan with a vinegar solution and rinse thoroughly. Place a condensate pan treatment tablet in the cleaned pan to slow biological growth between service visits.
For the evaporator coil, use a commercially available no-rinse coil cleaner spray following the manufacturer’s instructions exactly. Do not use bleach on the coil as it corrodes aluminum fins over time. Allow the cleaner to foam and drain naturally into the drip pan. This step removes organic buildup from the coil surface that would otherwise support ongoing mold growth.
Step 6: Replace the Air Filter
Remove the old filter and seal it in a plastic bag before disposal to avoid releasing spores back into the home. Install a new filter rated MERV 8 or higher. Higher MERV-rated filters capture mold spores and fine particles more effectively than standard filters. If indoor air quality is a significant concern, upgrading to MERV 11 or 13 provides meaningfully better spore capture with each air cycle.
Step 7: Run the System and Monitor
Restart the system and run it through a full cycle. Walk through each room and assess the air coming from the vents. A significant reduction or elimination of the musty odor is the primary indicator of successful surface treatment. If the odor persists or returns within days, mold growth is deeper in the ductwork than accessible surface cleaning can address.
When to Remove Mold from Air Ducts Professionally
Many air duct mold situations go beyond what homeowners can safely and effectively treat with the steps above. Professional duct cleaning and mold remediation is the appropriate choice when:
Mold is visible deep inside flexible or rigid ductwork beyond the vent opening. Professional duct cleaning equipment includes rotary brushes, HEPA vacuums, and negative pressure systems that clean the full interior length of ductwork safely.
The system uses fiberglass duct board or internally lined metal ducts. As noted above, mold in these materials requires section replacement rather than cleaning. A professional assessment identifies which sections require replacement and ensures the work is done without contaminating the rest of the system.
The musty odor persists after thorough surface cleaning. Persistent odor after cleaning the accessible components indicates established growth in areas the homeowner cannot reach. A professional duct cleaning service addresses the entire duct run including sections that connect to the air handler and main trunk lines.
Household members are experiencing ongoing respiratory symptoms. Elevated indoor spore levels from duct contamination that is not fully resolved by surface cleaning require professional HEPA vacuuming and air scrubbing to normalize indoor air quality. A professional mold inspection and testing service can confirm through air sampling whether spore levels have returned to safe ranges after cleaning.
Mold followed a water damage event affecting the HVAC system. When flooding or major leaks have introduced water into ductwork or the air handler, mold and water damage repair requires professional assessment to identify all affected components and treat or replace them appropriately.
Preventing Air Duct Mold from Returning
Successful treatment is only half of the solution. The moisture conditions that allowed air duct mold to develop will produce the same result again without preventive changes.
Maintain Indoor Humidity Below 50 Percent
This is the single most impactful preventive step available to Florida homeowners. Run your air conditioning consistently and use supplemental dehumidification in rooms with limited airflow. A digital hygrometer in each high-risk area provides real-time humidity readings that allow you to intervene before conditions reach the mold growth threshold.
Change Air Filters on Schedule
In Florida’s climate where the HVAC system runs almost continuously, filters typically require replacement every 30 to 60 days rather than the 90-day interval appropriate for less active systems. A clean filter maintains proper airflow, prevents organic buildup inside the ducts, and captures spores before they can accumulate on duct surfaces.
Seal Duct Leaks
Have a qualified HVAC technician inspect the ductwork for gaps, loose connections, and deteriorating duct tape or mastic sealant at joints. Sealing leaks eliminates the pathway for warm humid outdoor air to enter the cooled duct interior and condense. This single change can dramatically reduce the ongoing moisture load inside the duct system.
Schedule Annual HVAC Maintenance
A professional HVAC tune-up once a year includes coil cleaning, drain line flushing, refrigerant level verification, and inspection of all duct connections. This maintenance removes the organic buildup that accumulates on coils and in the drain system and identifies moisture problems before they produce visible mold.
Insulate Ducts in Unconditioned Spaces
Ductwork running through attics, crawl spaces, or exterior wall cavities should be properly insulated to minimize the temperature differential between the conditioned air inside the duct and the surrounding environment. Adequate insulation significantly reduces condensation on interior duct surfaces during each cooling cycle.
For broader guidance on controlling mold throughout a Florida home during the high-humidity months, our guide on how to prevent mold in tropical climates covers the most effective year-round moisture management strategies.
Final Thoughts
Knowing how to kill mold in AC ducts requires understanding both the right methods and their limits. Surface treatment of accessible components like vent registers, the air handler, and the drip pan is appropriate and effective for early-stage contamination. Growth that has spread into the full duct run, or that exists in duct materials that cannot be cleaned, requires professional remove mold from air ducts service with equipment that goes beyond what homeowners can safely deploy.
The common thread in all cases is that mold in your ductwork is a whole-home air quality problem because your duct system distributes air to every room. Resolving it thoroughly protects every member of your household rather than just the room where the growth originated.
The team at The Mold Guys provides professional mold inspection, mold removal, and water damage restoration services across Southwest and Central Florida. Contact The Mold Guys today for a professional assessment of your HVAC system and indoor air quality whenever duct mold is suspected.
FAQs
Q: Can I use bleach to kill mold in AC ducts?
A: Bleach is not recommended for duct interiors. It corrodes metal surfaces over time, cannot penetrate porous duct lining materials, and the fumes distribute through the system when the AC restarts. White vinegar and EPA-approved antimicrobial products are safer and more effective choices for accessible duct surfaces.
Q: How do I know if my AC ducts have mold?
A: The most reliable sign is a musty odor that appears or intensifies when the system runs. Visible growth around vent registers, increased respiratory symptoms in multiple rooms, and a dusty home despite regular cleaning also indicate possible air duct mold. Professional air sampling confirms contamination.
Q: Can air duct mold make you sick?
A: Yes. Air duct mold distributes spores through every room connected to the system with each operating cycle. Regular inhalation of elevated spore concentrations causes respiratory irritation, allergy symptoms, and worsening asthma. Black mold in ducts additionally releases mycotoxins that produce more serious health effects with prolonged exposure.
Q: How often should AC ducts be cleaned to prevent mold?
A: Professional duct cleaning every three to five years is the general recommendation for most homes. In Florida’s humid climate, homes with prior mold issues, pets, or occupants with allergies may benefit from more frequent cleaning. Filter replacement every 30 to 60 days and annual HVAC maintenance significantly reduce how quickly contamination develops between full cleanings.
Q: What duct types cannot be cleaned if they have mold?
A: Fiberglass duct board and internally lined metal ducts with fiberglass lining cannot be cleaned effectively once mold is established because the porous lining absorbs cleaning agents and retains moisture. These sections must be removed and replaced. A professional duct assessment identifies which duct types and sections require replacement versus cleaning.