
A leaking roof is one of the most deceptive home problems a Florida homeowner can face. Unlike a burst pipe that announces itself immediately, roof leaks often begin as slow seeps through damaged shingles, failed flashing, or compromised sealant around vents and chimneys. By the time the leak becomes obvious from inside the home, water damage from leaking roof conditions has typically been building inside ceiling cavities, wall assemblies, and structural framing for far longer than the visible signs suggest.
The most important fact to understand about roof leak water damage is that what you see on your ceiling or wall is almost never the full extent of the problem. Water travels along structural members, insulation, and vapor barriers before it finds an exit point visible from below. A stain appearing in the center of a ceiling may trace back to a leak point several feet away at the roof surface. Acting on the visible signs quickly and arranging a professional water damage inspection is what prevents a contained repair situation from developing into a widespread mold from water damage problem throughout your home’s upper structure.
How Roof Leaks Cause Water Damage Inside the Home
Understanding how water travels from a damaged roof into your living spaces helps you trace the signs back to their source and address the full extent of the damage rather than just the visible symptom.
The Water Travel Path From Roof to Ceiling
When rain penetrates the roof surface through damaged or missing shingles, cracked flashing, failed sealant, or overwhelmed drainage during heavy storms, it contacts the roof decking directly. The decking material, typically plywood or oriented strand board, absorbs water rapidly. From the decking, water moves downward along rafters and roof trusses following the path of least resistance. It may travel several feet along a rafter before reaching a point where it drips onto the ceiling drywall or insulation below.
This travel path is why the visible stain on a ceiling is almost never directly below the actual breach point in the roof. Water may enter the roof at the ridge, travel twelve feet along a rafter, and exit onto the ceiling drywall at a point that appears to be unrelated to any visible roof damage above it. This mismatch between the visible interior stain and the actual exterior breach point is one of the most important reasons that identifying roof leak damage requires more than a visual inspection from inside the home.
Why Florida Storms Accelerate Roof Leak Damage
In Florida, roof leaks occur in a climate that maximizes their impact. Heavy afternoon rainfall during storm season dumps significant water volumes in short periods, overwhelming marginal roof drainage conditions. Wind-driven rain during tropical events enters at angles that standard roof designs are not intended to handle, pushing water past flashing and around penetrations that would otherwise remain watertight in vertical rainfall.
The warm temperatures that persist year-round in Florida mean that any moisture that enters the roof structure encounters the ideal conditions for rapid mold development. What might take weeks to produce mold in a cooler climate can establish in the attic insulation or ceiling framing of a Florida home within 24 to 48 hours of a significant water intrusion event.
The Signs of Water Damage From Leaking Roof on Ceilings
These are the specific indicators to look for on interior ceiling surfaces that point to an active or past roof leak as the source of moisture.
Ceiling Stains and Discoloration
The most recognizable sign of water damage from leaking roof conditions is the characteristic ring stain on a ceiling surface. These stains appear in shades of yellow, tan, or brown and typically have a darker outline at the boundary of where moisture spread before evaporating. The ring pattern forms because dissolved minerals and organic compounds from the building materials are carried to the outer edge of the wet zone as the water evaporates, leaving a concentrated deposit at that boundary.
Reading the Stain Pattern
A single ring stain with no additional rings inside it suggests a single water event such as one significant storm that produced one leak episode.
Multiple concentric rings inside each other indicate repeated wetting and drying cycles, meaning the same leak point has been active across multiple rain events. This is a more serious finding because it confirms an ongoing structural vulnerability rather than a one-time event.
A stain that is still slightly damp or darker in color when you observe it suggests an active or very recent leak. The ceiling material has not yet had time to dry fully. This warrants immediate action.
A stain that extends from a ceiling onto an adjacent wall indicates that the volume of water from the roof leak was significant enough to saturate the ceiling and begin migrating down the wall behind it. This suggests both ceiling and upper wall materials may require assessment and replacement.
Ceiling Paint Changes
Paint on ceiling surfaces responds visibly to moisture saturation from above in ways that are consistent and recognizable.
Bubbling or blistering in ceiling paint where raised pockets appear in the paint film indicates active moisture migration from above at the time of observation. The moisture is moving through the drywall and pushing against the paint from behind.
Peeling paint where the paint film separates from the ceiling surface and curls downward indicates that moisture saturation has been sufficient and sustained to permanently break the adhesion between paint and substrate. This typically represents a more prolonged or repeated leak event than bubbling alone.
Sagging or soft ceiling surface is a serious indicator. When ceiling drywall becomes saturated enough to lose its structural integrity, the weight of absorbed water combined with the compromised material causes the ceiling surface to bow downward. A ceiling that feels soft or visibly sags when you press on it gently is at risk of structural failure and represents a safety concern in addition to a water damage situation.
Attic Signs That Confirm a Roof Leak
If you have attic access, inspecting the attic interior during or immediately after rain is the most reliable way to confirm both that a leak is present and to identify its approximate entry point.
Water staining or wet spots on the underside of roof decking confirm active water entry at or near the stained area.
Wet or matted insulation in attic floor areas indicates that water has been dripping from the roof structure onto the insulation below. Insulation that has absorbed water loses its thermal performance and becomes a persistent mold habitat if not replaced.
Mold growth on attic framing or decking confirms that a roof leak has been present long enough for mold colonization to occur, which in Florida’s climate means the leak has been active for at least a few days. For a detailed look at what causes and drives attic mold specifically, our guide on what causes mold in the attic covers the full range of contributing factors.
Daylight visible through the roof structure from inside the attic on a bright day confirms a physical breach in the roof surface and indicates the approximate area where repairs are needed.
Signs of Water Damage Roof Entry Points on the Exterior
Identifying the signs of water damage roof conditions from outside the home helps locate the actual breach point rather than just the interior symptom. These are the most common exterior indicators of where a roof is allowing water intrusion.
Exterior Location | Signs of Damage or Failure |
Shingles | Missing, cracked, curling, or granule-depleted shingles in any area |
Ridge cap | Lifted, cracked, or missing ridge cap shingles at the roof peak |
Flashing at chimney | Separated, corroded, or poorly sealed flashing at all chimney edges |
Flashing at vents and pipes | Cracked rubber boots, loose collars, or separated sealant at all roof penetrations |
Valley flashing | Rust, separation, or debris accumulation in the valley where two roof sections meet |
Gutters and downspouts | Sagging gutters, separated from fascia, or blocked downspouts causing overflow at the roofline |
Soffit and fascia | Rot, staining, or paint peeling on soffit and fascia boards indicating water running behind the gutter |
Skylights | Failed sealant at the skylight frame perimeter or cracked flashing at the curb |
Any of these exterior conditions creates a pathway for water to enter the roof assembly and eventually appear as interior water damage from leaking roof signs on ceilings and walls.
Signs of Water Damage on Walls From a Roof Leak
While ceiling damage is the most direct indicator of a roof leak, water from a roof penetration can and does travel to adjacent wall surfaces. These are the wall-specific signs that indicate a roof leak rather than a plumbing or exterior wall intrusion source.
Staining That Appears Near the Top of Walls
Water damage that originates from a roof leak typically appears on walls near the junction of the wall and ceiling, or in the upper sections of walls adjacent to exterior roof surfaces. Staining that begins at or near the ceiling line and runs downward indicates water traveling from the ceiling space onto the wall surface. This is distinct from staining that begins at the base of a wall, which typically indicates foundation or plumbing-related moisture rather than roof leak-driven moisture.
Staining Concentrated Around Chimneys and Exterior Corners
Water from a leaking roof most commonly enters at the points where the roof meets vertical surfaces such as chimneys, dormer walls, and exterior wall sections that project above the main roof line. Interior staining on walls adjacent to chimneys or at corners where roof sections meet exterior walls is strongly associated with flashing failure at those specific locations rather than with general shingle deterioration across the roof field.
Peeling Paint on Upper Walls and Ceilings Together
When paint peeling or bubbling appears on both the ceiling and the adjacent upper wall in a connected pattern, it confirms that water has been spreading from the ceiling surface onto the wall. This connected pattern of paint failure indicates that the volume and duration of the leak has been sufficient to saturate both the ceiling and upper wall materials from a single roof entry point above.
Conducting a Water Damage Inspection After a Suspected Roof Leak
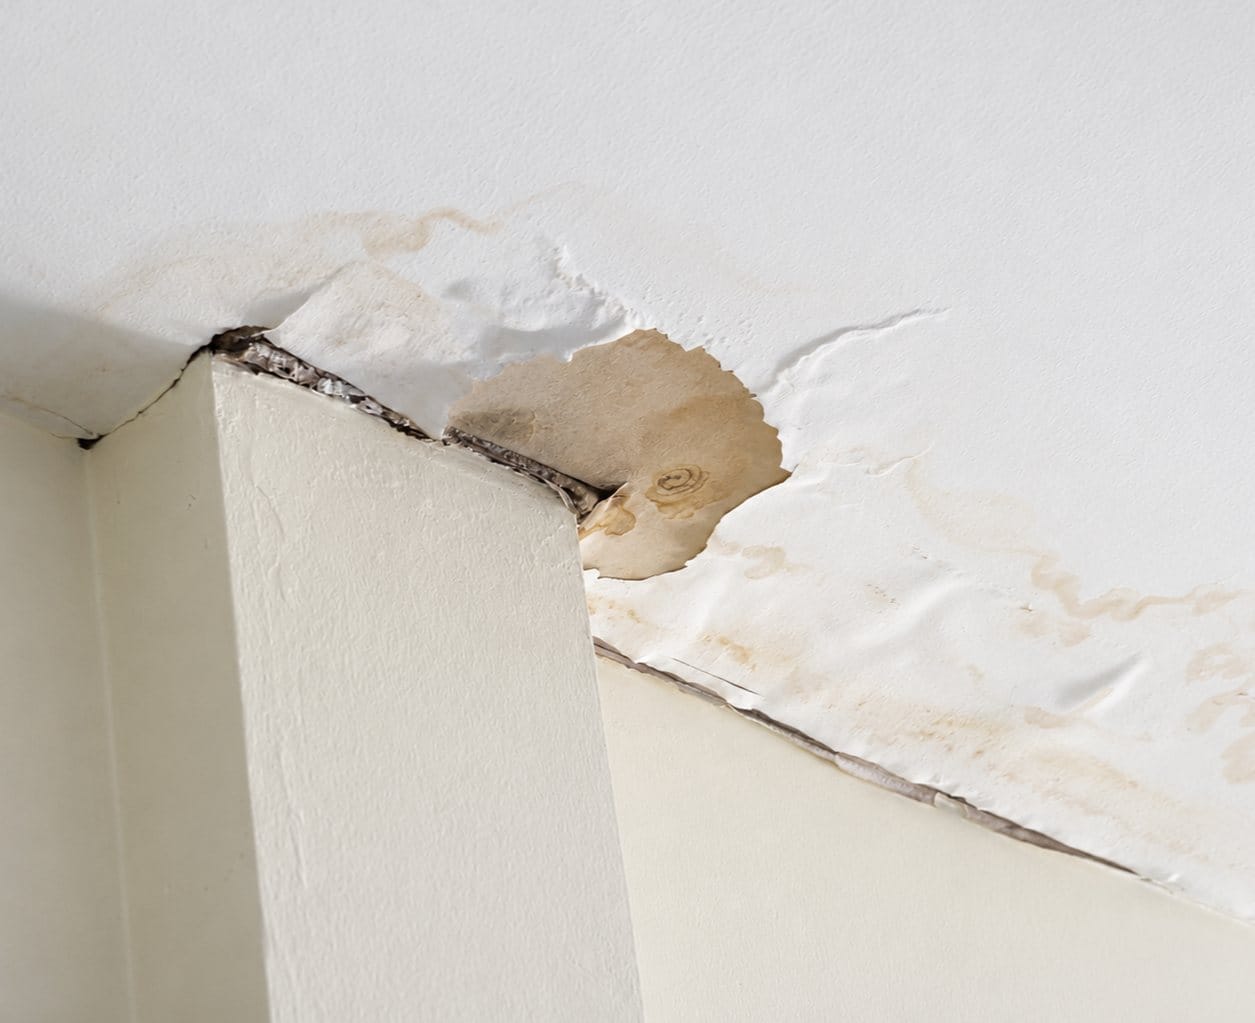
When you identify the interior signs of water damage from leaking roof conditions, the appropriate next step is a systematic water damage inspection that goes beyond the visible staining to assess the full extent of material saturation and any developing mold from water damage conditions.
What a Professional Water Damage Inspection Involves
A professional water damage inspection for roof leak damage uses a combination of tools and methods to assess damage that is not visible at the surface.
Moisture meters measure the moisture content of ceiling drywall, wall drywall, insulation, and wood framing. Readings significantly above baseline in materials that appear visually dry confirm hidden saturation that creates ongoing mold risk even when the surface looks undamaged.
Thermal imaging cameras identify temperature differentials in ceiling and wall surfaces that indicate areas of trapped moisture inside the building assembly. Wet materials hold temperature differently from dry materials, creating a visible thermal pattern that maps the full extent of moisture spread regardless of whether surface staining has appeared.
Attic inspection by a professional inspector following rain documents the location and extent of water entry points with photographs and moisture readings that form the basis for both the roofing repair scope and the interior remediation plan.
Air sampling in rooms showing water damage indicators assesses whether mold spore concentrations have risen above outdoor baseline levels, confirming whether mold from water damage has already begun establishing in the affected materials.
The Connection Between Roof Leaks and Mold From Water Damage
The path from roof leak to active mold development in a Florida home is short and fast. This timeline helps explain the urgency of addressing water damage from leaking roof conditions as soon as signs are identified.
Time After Roof Leak Begins | Condition in Affected Materials |
0 to 24 hours | Active water saturation of ceiling drywall, insulation, and framing. No mold yet. |
24 to 48 hours | Mold spore germination begins on saturated materials. Florida’s warmth accelerates this. |
3 to 7 days | Visible mold colonies on attic framing, insulation, and ceiling drywall back surface. |
1 to 2 weeks | Mold spreads through ceiling cavity. May begin affecting upper wall framing. |
Beyond 2 weeks | Structural materials potentially compromised. Remediation scope significantly larger. |
In a Florida home, this timeline moves faster than the national average because warm temperatures accelerate mold colonization at every stage. A roof leak that a homeowner notices after two or three weeks of gradual staining buildup may already have produced significant mold growth in the attic and ceiling cavity even when the visible surface damage looks relatively minor.
What Professional Restoration of Water Damage From a Roof Leak Involves
Once the visible signs of roof leak damage have been identified and a water damage inspection has confirmed the extent of material saturation, professional restoration of water damage is the appropriate next step. This is not a process homeowners can effectively manage with consumer tools because the equipment required to dry structural materials to verified safe moisture levels, treat any mold that has established, and confirm the work is complete through objective testing is only available at a professional grade.
Here is what a professional water damage restoration process for roof leak damage involves from start to finish.
Roof Repair Confirmation Before Interior Work Begins
A professional restoration team will not begin interior work until the roof breach has been confirmed repaired and watertight. Beginning any interior restoration before the exterior leak point is sealed produces work that is damaged by the next rain event. Professionals confirm the repair is complete before any demolition, drying, or reconstruction begins inside the home.
Removal of All Saturated Materials
Ceiling drywall saturated beyond the threshold where drying in place is effective, all water-damaged attic insulation, and any structurally compromised materials are removed by the restoration team before drying equipment is deployed. This step is essential because saturated porous materials cannot be dried effectively while installed and will continue supporting mold growth if left in place. Professionals remove ceiling drywall conservatively beyond the visible stain boundary because moisture consistently migrates further than visible staining indicates.
Structural Drying With Professional Equipment
Industrial air movers and commercial dehumidifiers are deployed throughout the affected space and run continuously until moisture meter readings in structural framing, roof decking, and remaining building materials return to safe levels. This process typically takes three to five days of continuous equipment operation. Professional drying equipment removes moisture from structural materials at a rate that no consumer-grade fan or household dehumidifier can match, and moisture meter verification rather than surface feel or elapsed time is what confirms the drying is complete.
Mold Assessment and Treatment of Structural Materials
Once the structural drying phase is complete, the restoration team assesses the framing, roof decking, and any remaining building surfaces for mold that established during the period the materials were saturated. Any mold growth present on wood framing or decking is treated with professional-grade antimicrobial products before new materials are installed. Closing a repaired wall or ceiling over any untreated mold growth seals an active colony in place where it continues spreading and releasing spores through every gap in the new surface above it.
Post-Treatment Verification Before Reconstruction
Before new insulation and drywall are installed, the restoration team verifies through moisture meter readings and where indicated through post-treatment air sampling that the structural materials are both dry and mold-free. This verification step is what distinguishes professional restoration from incomplete treatment that produces recurring problems. The Mold Guys provide this verification as a standard part of every water damage restoration project, giving homeowners documented confirmation that their home is safe before reconstruction closes up the repaired areas.
Reconstruction With Appropriate Materials
Once the structure is confirmed dry and treated, reconstruction using materials appropriate for the repaired area proceeds. In areas with a history of roof leak damage, mold-resistant drywall and appropriate vapor barriers provide additional protection against future moisture events affecting newly installed materials.
Preventing Future Roof Leak Water Damage
The most cost-effective approach to roof leak water damage is preventing its recurrence after restoration is complete.
Annual Roof Inspections
Schedule a professional roof inspection once a year, ideally before Florida’s storm season begins in June. A qualified roofer identifies developing vulnerabilities such as aging shingles, lifted flashing, and deteriorating sealant around penetrations before they become active leak points during the next storm event.
Post-Storm Attic Checks
After any significant storm event, check your attic with a flashlight for any new wet spots, water staining, or dripping before the next rain event creates additional damage. Catching a new breach point after a single storm prevents the cumulative damage that develops from multiple rain events through the same unrepaired vulnerability.
Maintain Gutters and Drainage
Clean gutters at least twice a year in Florida where leaf fall and debris accumulate consistently. Blocked gutters cause water to back up under roof edges and introduce moisture into the roof assembly at the eave. Confirm that all downspout extensions discharge water at least four feet from the foundation.
Address Any Minor Roof Damage Immediately
A single displaced shingle or a small area of lifted flashing repaired within days of being noticed costs a fraction of the restoration of water damage that accumulates through weeks of subsequent rain events through the same unrepaired breach. Our guide on how to fix water damage quickly covers the essential immediate response steps that limit cumulative damage from any water intrusion source.
Final Thoughts
Water damage from leaking roof conditions is one of the most common and most underestimated problems in Florida homes. The visible signs on ceilings and walls represent the downstream end of a water travel path that begins at a specific breach point on the roof surface and travels through structural materials before appearing inside the home. By the time a stain is visible, material saturation and in many cases mold from water damage has already been developing in the hidden building assembly for days or longer.
Acting on the early signs quickly, arranging a thorough water damage inspection, completing the roof repair before any interior work begins, and following the correct restoration of water damage sequence protects both your home’s structural integrity and your family’s indoor air quality.
The team at The Mold Guys provides professional water damage inspection, water damage restoration, and mold removal services across Southwest and Central Florida. With over 25 years of experience addressing Florida’s most common water damage and mold problems, they have the tools and expertise to assess roof leak damage completely and restore your home safely. Contact The Mold Guys today for immediate professional assessment after any roof leak or ceiling water damage event.
FAQs
Q: How do I know if my ceiling stain is from a roof leak versus a plumbing leak?
A: Staining that appears near the ceiling-wall junction or in upper wall sections, that worsens during or after rain, or that is located below attic space rather than below a bathroom or pipe run is most consistent with a roof leak. Staining directly below a bathroom or plumbing fixture typically indicates a plumbing source rather than a roof origin.
Q: Can a roof leak cause mold inside my ceiling?
A: Yes, and in Florida it happens faster than most homeowners expect. Mold can begin germinating on saturated ceiling drywall and attic insulation within 24 to 48 hours of significant water intrusion. A roof leak that has been producing ceiling staining over multiple rain events has almost certainly created mold growth inside the ceiling cavity.
Q: How long does restoration of water damage from a roof leak take?
A: The structural drying phase alone typically takes three to five days using professional equipment. Adding material removal, mold treatment if needed, and reconstruction, the full restoration process commonly takes one to three weeks depending on the extent of the damage and whether significant mold remediation is required before new materials can be installed.
Q: Should I repair the roof or treat the interior water damage first?
A: Always repair the roof first. Any interior restoration work done before the roof breach is confirmed repaired will be damaged by the next rain event. Confirm the repair is complete and watertight before beginning any interior demolition, drying, or reconstruction work.
Q: What does a professional water damage inspection involve for a roof leak?
A: A professional water damage inspection for a suspected roof leak includes moisture meter readings of ceiling and wall materials, thermal imaging to identify hidden saturation beyond the visible stain area, attic inspection documenting entry points and affected structural materials, and where indicated, air sampling to assess whether mold spore levels have risen above safe thresholds in the affected rooms.