
Of all the spaces in a home where mold develops, the attic is one of the most damaging and the most frequently overlooked. By the time most homeowners discover mold growing on their roof sheathing, rafters, or insulation, it has often been present for months. The most effective way to prevent it is to ensure balanced airflow through the attic year-round, with cool air entering at the soffits and warm moist air exhausting at the ridge, because without that continuous movement, moisture in attic spaces has nowhere to go and mold follows quickly. We will walk through exactly how to achieve this and what to do if mold has already established, throughout this guide.
Attic mold does not stay in the attic. Spores released from active colonies work their way into the living spaces below through ceiling gaps, recessed lighting, HVAC connections, and attic access hatches. This means that moisture in attic spaces and the mold it produces can directly affect your indoor air quality, your family’s respiratory health, and ultimately the structural integrity of your roof. Addressing attic ventilation to prevent mold correctly is one of the highest-value investments a homeowner can make in long-term property protection.
This guide explains exactly how attic ventilation works, why it fails, what the signs of a ventilation-related mold problem look like, and the practical solutions that create a lasting mold-free attic environment.
Why Attics Develop Mold Problems
Attics are naturally susceptible to mold because they sit at the intersection of two moisture forces that work against each other. Warm humid air from the living spaces below rises into the attic through gaps in the ceiling. Cool outside air contacts the underside of the roof sheathing in colder months, or extreme heat builds up in summer. The result in both cases is condensation forming on surfaces inside the attic where moisture can accumulate for extended periods before evaporating.
Unlike a bathroom where you use it briefly and leave, the attic is a space where moisture either builds up slowly over time or is introduced in a single event like a roof leak and then sits with nowhere to go. Without adequate air movement to carry that moisture out, it condenses on available surfaces and mold begins growing on the wood sheathing, insulation, and framing within the space.
Florida homes face a specific version of this challenge. Rather than cold-weather condensation, the primary driver is the consistently high outdoor humidity combined with the extreme heat that builds up in summer attics. When this hot humid air does not move through and out of the attic space efficiently, moisture in attic areas accumulates and creates near-ideal mold growth conditions throughout the warmer months. Our guide on what causes mold in the attic covers the full range of contributing factors in detail.
Understanding How Attic Ventilation Works
Before addressing solutions, it helps to understand what proper attic ventilation actually involves. Effective attic ventilation is not simply about having vents. It is about having the right types of vents in the right locations to create balanced continuous airflow through the entire attic space.
The most effective system operates on a simple principle: cool air enters at the lowest point of the attic near the eaves and warm moist air exits at or near the peak of the roof. This creates a continuous upward flow that carries humidity out of the attic naturally without requiring powered equipment.
- Soffit vents are installed along the underside of the eave overhang around the perimeter of the house. They serve as the intake point for cooler exterior air. For soffit vents to work effectively they must remain unobstructed by insulation inside the attic. A common installation mistake is allowing blown-in or batt insulation to cover the inner edge of soffit vents, which blocks the intake airflow completely.
- Ridge vents run along the peak of the roof and serve as the exhaust point for the rising warm moist air. Ridge vents work most effectively when combined with functioning soffit vents because the soffit intake creates the pressure differential that drives air up and out through the ridge.
- Gable vents are installed at the triangular end walls of the attic and allow cross-ventilation. They are less effective than a soffit-to-ridge system for continuous airflow but contribute usefully in combination with other ventilation types.
- Powered attic ventilators are electric or solar-powered fans that actively exhaust air from the attic. They are most useful in situations where passive ventilation alone is insufficient but come with a caveat: if they exhaust air faster than the soffit vents can supply replacement air, they can draw conditioned air up from the living spaces below, increasing energy costs and potentially drawing moisture in from the living areas.
The standard guidance from the Department of Energy and building codes suggests a minimum ventilation ratio of one square foot of net free vent area for every 150 square feet of attic floor space, split roughly equally between intake at the soffits and exhaust near the ridge.
Signs That Attic Ventilation Is Failing
Many homeowners do not inspect their attic regularly, which means ventilation problems and early mold growth go undetected for extended periods. These are the warning signs that your attic ventilation may be inadequate and that moisture in attic spaces is creating conditions for mold.
Warning Sign | What It Indicates |
| Musty odor on upper floors | Mold migrating down from attic |
| Dark staining on roof sheathing | Active or past mold growth on wood |
| Water stains or mineral deposits | Persistent condensation or water intrusion |
| Frost buildup on roof underside | Warm air infiltrating and condensing |
| Damp or stained insulation | Moisture saturation in attic materials |
| Higher energy bills | Excessive heat buildup from poor airflow |
| Premature shingle granule loss | Heat deteriorating roofing from underside |
Effective Attic Ventilation Solutions for Mold Prevention
Implementing proper attic ventilation to prevent mold involves a combination of ensuring the right vent types are in place, removing obstructions, sealing air leaks from below, and correcting any sources of moisture being introduced directly into the attic space.
Step 1: Inspect and clear all existing vents.
Begin with a thorough inspection of every vent opening in your attic. Soffit vents along the eaves are frequently blocked by insulation that was installed without baffles to hold it back from the vent openings. Install foam or cardboard baffles in each rafter bay at the eave to create a clear channel from the soffit vent to the open attic space, regardless of insulation depth. Clear any bird nests, wasp nests, or debris from gable vents or roof vents. Inspect the exterior of ridge vents to confirm they are unobstructed and properly sealed against rain intrusion while remaining open to airflow.
Step 2: Redirect exhaust fans that vent into the attic.
This is one of the most common and significant contributors to moisture in attic spaces. Bathroom exhaust fans and kitchen range hoods that terminate inside the attic rather than exhausting through the roof or an exterior wall dump moist warm air directly into the attic with every use. Inspect each exhaust fan duct in your attic to confirm it terminates at a vent cap that exhausts to the exterior. Reconnect or reroute any fans that are currently venting into the attic space. Use insulated flexible duct or rigid metal ductwork to carry the exhaust all the way to an exterior vent cap.
Step 3: Add ventilation if the existing system is insufficient.
If your attic has soffit vents but no ridge vent, adding a continuous ridge vent significantly improves airflow through the entire attic length. This is a roofing project that is best combined with routine maintenance or roof replacement to minimize cost. If full ridge ventilation is not feasible, adding individual roof vents near the peak in each section of the attic provides partial improvement. If passive ventilation alone is insufficient for your attic’s configuration, a solar-powered attic ventilator provides active exhaust without increasing electricity consumption.
Step 4: Seal ceiling air leaks from the living space below.
Warm humid air from bathrooms, kitchens, and living spaces rises into the attic through every gap in the ceiling. Common pathways include gaps around recessed light fixtures, spaces around plumbing vent stacks, gaps around HVAC boots where ducts penetrate the ceiling, and the perimeter of the attic access hatch. Seal each of these with appropriate fire-rated caulk, expanding foam, or weatherstripping. This reduces the volume of moisture-laden air entering the attic from below, which is the primary driver of condensation in cooler months.
Step 5: Ensure insulation is properly installed and at the right depth.
Proper insulation keeps living space heat from rising excessively into the attic in summer and reduces condensation on the underside of the roof in cooler weather. Ensure insulation covers the attic floor evenly without blocking the soffit vent channels at the eaves. In Florida the recommended insulation R-value for attics is R-38 to R-60 depending on the specific zone. If your existing insulation is damaged from moisture or mold it should be removed and replaced as part of any attic mold removal and remediation process.
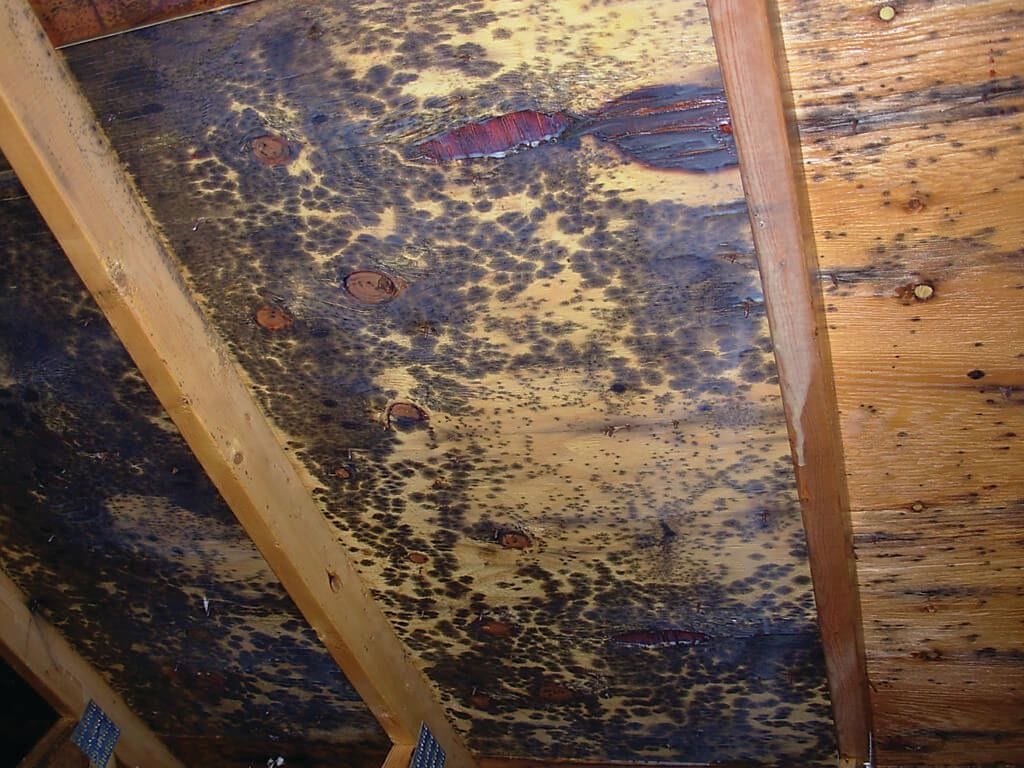
Attic Mold Removal: What the Process Involves
When mold has already established in your attic, addressing ventilation prevents future growth but does not eliminate the existing colony. Attic mold removal must be completed before new ventilation improvements fully protect the space.
For small areas of surface mold on hard wood surfaces, a careful application of an EPA-approved antimicrobial borate solution or commercial mold-killing product followed by HEPA vacuuming of loose spores is appropriate. The treated area must be confirmed completely dry before any sealing or painting is applied.
For more widespread mold growth, professional attic mold removal is the safer and more complete option. Professional remediation in an attic involves:
- Containment to prevent spores from migrating downward through the ceiling during treatment
- HEPA vacuuming of all affected surfaces
- Application of commercial antimicrobial treatments to all mold-affected wood
- Physical removal of insulation that has been contaminated by mold growth
- Dry ice blasting or sanding in severe cases where mold has deeply penetrated the wood grain
- Post-remediation air sampling to verify spore levels have returned to acceptable ranges before the space is closed and new insulation is installed
Professional mold removal services have the specialized equipment and protocols needed to work safely in attic environments where confined spaces, respiratory hazards, and structural surfaces all require careful management.
Attic Mold Prevention After Remediation
Once attic mold removal is complete and ventilation improvements are in place, ongoing attic mold prevention requires consistent maintenance habits.
- Inspect the attic twice a year. The best times are spring before the humid season begins and fall after peak heat subsides. Look for any new staining, discoloration, or signs of moisture on the sheathing and rafters. Early detection of any new growth allows treatment before it spreads.
- Check the roof after significant weather events. Strong storms can dislodge shingles, damage flashing around chimneys and vents, or create new water entry points. Inspect the attic interior after any significant storm for signs of new water intrusion before it has time to produce mold.
- Keep gutters clean and functional. Blocked gutters cause water to back up under roof edges and introduce moisture into the attic structure. Clean gutters at least twice a year in Florida where leaf fall and storm debris accumulate consistently.
- Monitor indoor humidity in upper floor rooms. High humidity on the top floor of a home often indicates that attic conditions are contributing to moisture problems throughout the upper level. Keep indoor humidity between 30 and 50 percent through consistent air conditioning and dehumidification. For more detailed guidance on year-round moisture management in Florida, our guide on how to prevent mold in tropical climates covers the most effective strategies.
- Address any roof damage promptly. A minor roof repair completed within days of damage being identified prevents weeks or months of water intrusion that would require far more extensive water damage restoration and mold remediation to address afterward.
- Schedule professional attic inspections every few years. Even with good maintenance habits, a professional mold inspection of the attic every two to three years provides an objective assessment of whether ventilation is performing adequately and whether any early mold growth requires attention before it becomes a significant problem.
When Attic Mold Requires Immediate Professional Attention
Some attic mold situations cannot wait for a scheduled maintenance inspection. Contact a professional immediately when:
- Visible mold covers a significant portion of the roof sheathing or rafters
- You detect a strong musty smell on the upper floors of the home that does not have an identifiable bathroom or laundry room source
- Ceiling staining appears in upper floor rooms following a wet period without a clear plumbing explanation
- Insulation in the attic is wet, matted, or visibly discolored from moisture damage
- Anyone in the household is experiencing unexplained respiratory symptoms that worsen at home
These situations indicate mold growth that has moved beyond early-stage surface treatment and requires professional containment, removal, and ventilation correction to resolve safely. You can review the complete guide to mold remediation for a thorough understanding of what professional remediation involves and what to expect from the process.
Key Takeaways
Attic ventilation to prevent mold is not a single fix but a system that works correctly only when all its components are functioning together. Balanced soffit-to-ridge airflow, properly directed exhaust fans, sealed ceiling air leaks, and correctly installed insulation all contribute to an attic environment where moisture in attic spaces cannot accumulate to the levels that support mold growth.
When mold has already established, attic mold removal must address the existing growth before ventilation improvements protect the space going forward. And after remediation, consistent inspection and maintenance keep new growth from developing in a space that can so easily return to mold-favorable conditions without ongoing attention.
The team at The Mold Guys serves homeowners across Southwest and Central Florida with professional attic mold prevention assessment, safe attic mold removal, and the ventilation guidance needed to protect your roof structure long-term. Contact us today for a professional attic inspection and a clear plan for keeping your attic clean, dry, and mold-free.
FAQs
Q: How does poor attic ventilation cause mold growth?
A: Poor attic ventilation traps warm moist air in the attic space where it condenses on cooler surfaces like roof sheathing and rafters. This persistent moisture creates ideal conditions for mold spores to germinate and spread across the wood surfaces above your living space.
Q: How do I know if my attic has enough ventilation?
A: Inspect whether soffit vents are unobstructed, whether a ridge or roof vent provides exhaust near the peak, and whether all exhaust fans terminate outside rather than into the attic. Dark staining on sheathing, high attic temperatures, and a musty smell in upper rooms all suggest inadequate ventilation.
Q: Can I remove the attic mold myself?
A: Small areas of surface mold on accessible attic wood can be treated carefully with EPA-approved antimicrobial products and HEPA vacuuming. Widespread mold covering large sections of sheathing or rafters, or any growth in contaminated insulation, requires professional attic mold removal for safe and complete elimination.
Q: Will fixing ventilation stop attic mold from coming back?
A: Yes, when combined with completing attic mold removal first. Improved ventilation eliminates the moisture conditions that allowed mold to grow. Without treating existing mold first, improved airflow alone simply dries the surface without killing the established colony below it.
Q: How often should I inspect my attic for mold?
A: Inspect your attic at least twice a year, ideally in spring and fall. In Florida’s humid climate, also check after major storm events for any new water intrusion. A professional mold inspection every two to three years provides objective verification that ventilation is performing adequately and no early mold growth requires treatment.